Traffic is king when it comes to getting passive income from advertising. And the easier you can attract it, the better. Earlier, we went over the offbeat way to make money on paid Facebook traffic. This time, you’ll get a robust set of guidelines on how to use Pinterest to drive traffic to your website. And it’ll be genuinely FREE traffic; you’ll have to invest only some time and a pinch of creativity.
Boiling down, what you will learn after reading:
- create a Pinterest account and convert it to a Business one;
- make up nice and neat Pins (with tools recommended);
- setting up a website much faster;
- producing content faster;
- get a legitimate, free scheme of how to use Pinterest to drive traffic to your website and get a boost of ad views.
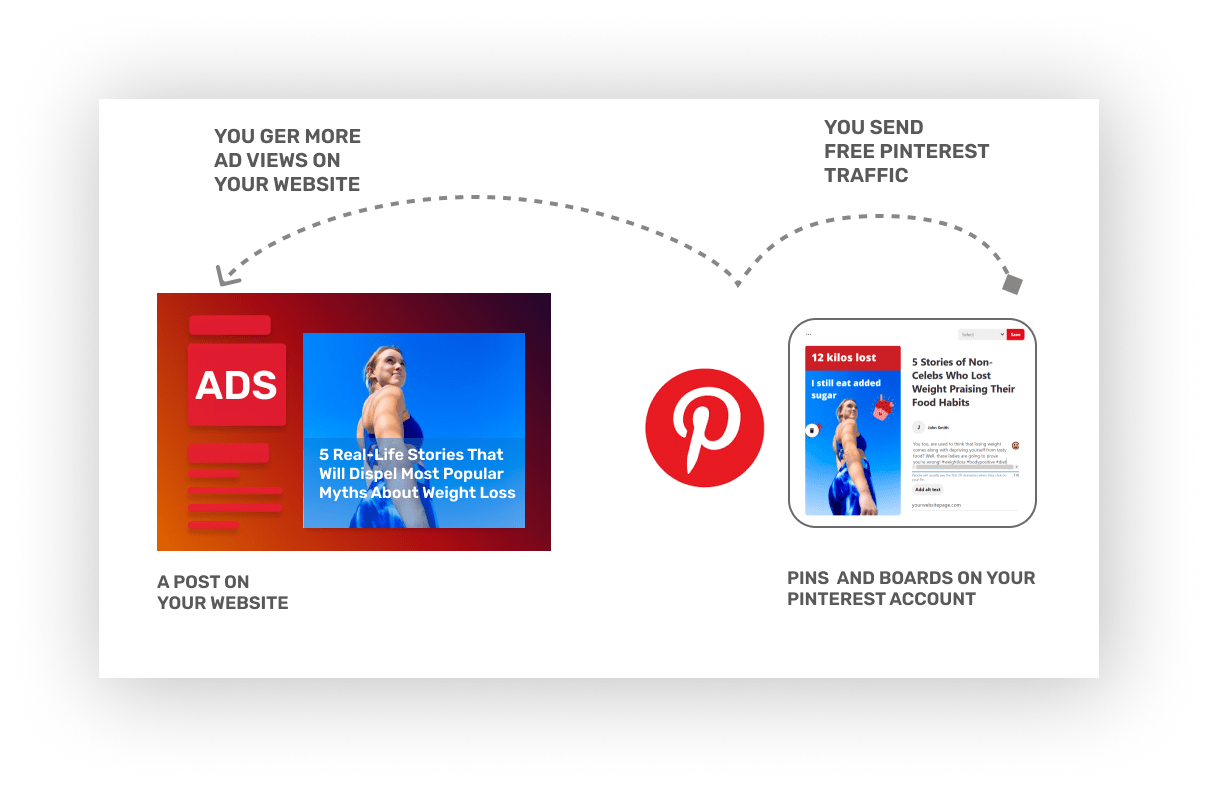
How does it work? Get a whole picture of how to use Pinterest to drive traffic to your website
Before you start this exciting journey to adapting Pinterest traffic for streaming profits, let’s outline the whole process. This way, it’ll be easier to break down a bigger task into smaller steps. And you will be able to skip the steps you find obvious.
Ok, to use Pinterest to drive traffic to your website, you will need:
- A website with content or an idea of a website, which you will pack with content.
- A vision of topics for your website and Pins.
- Pinterest Business account (we’ll explain why it should be a Business account a bit later).
- Pinterest boards and pins with visuals and descriptions that will link to your website’s pages.
That’s how all this is supposed to function.
How to make Pinterest your source of FREE traffic
We will start with the elementary steps – setting up your Pinterest account and converting it into a Business one. You can skip and move to the juiciest part of creating Pins if you already have a Business account.
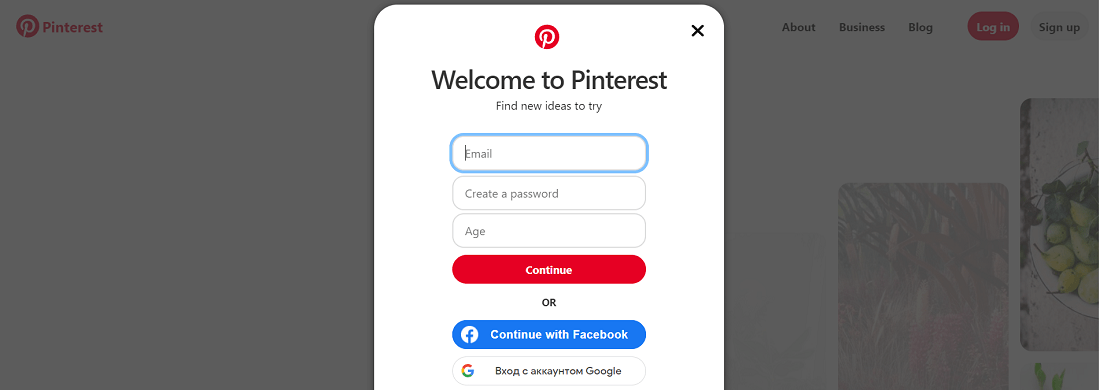
Sign up to Pinterest
1. Go to pinterest.com and click the SIGN UP button in the page’s header. In a pop-up window, enter your email, make up a password, and type in your age. Click Continue.
You can also link your Pinterest to Gmail or Facebook and use your login and password to enter.
Remember to confirm your email after you receive a verification note in your inbox.
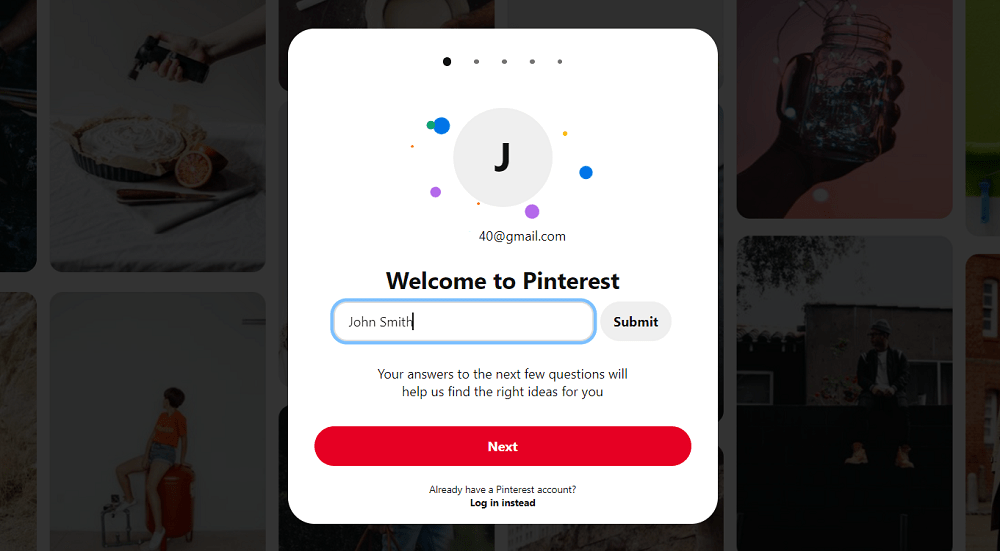
2. You’re in! You can now change your username or leave it as is. Click Submit if you typed in a new username, then click Next.
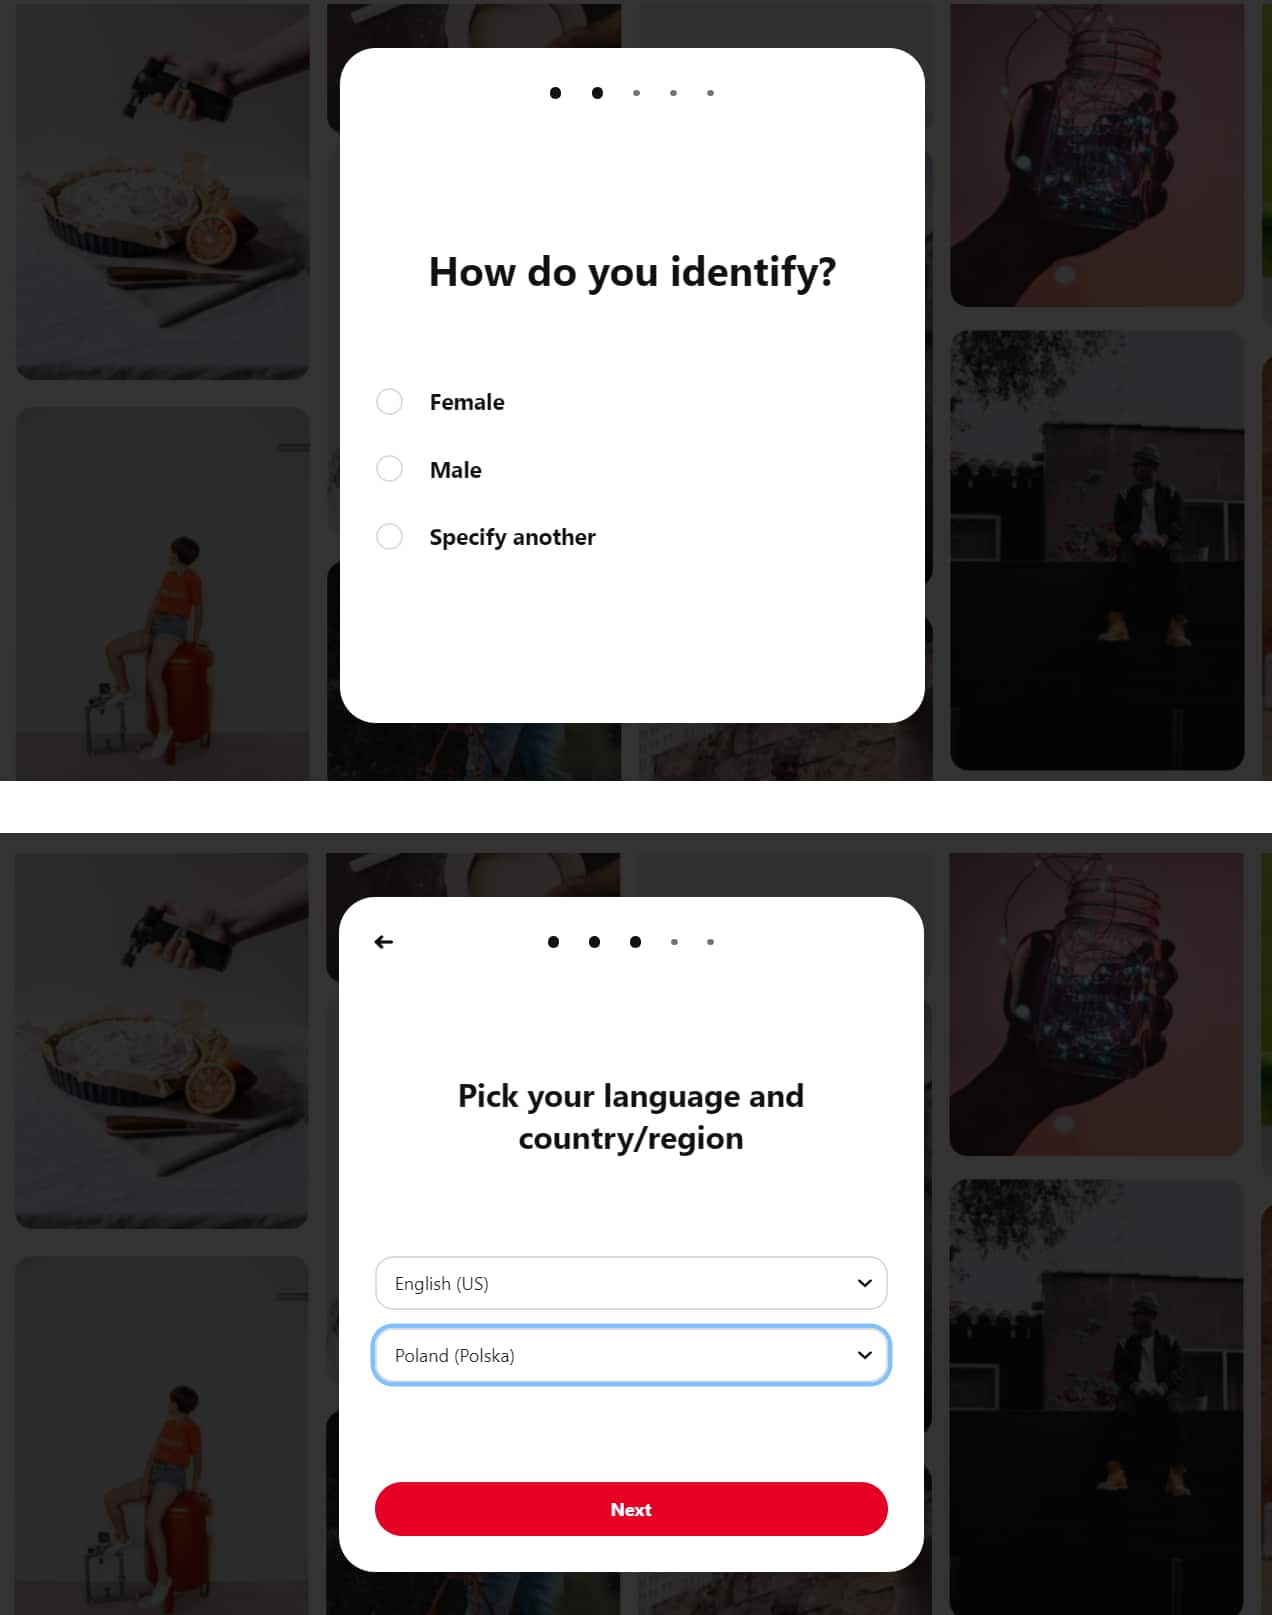
3. The next set of questions will be about your gender, language, and country.
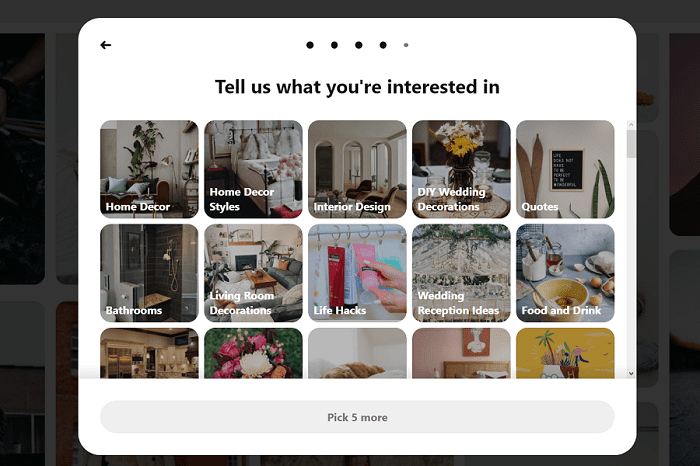
4. Finally, Pinterest offers you to pick 5 more relevant topics. Choose those that match your niche and future blog posts and pins.
5. Congrats, you’re all set up! Now let’s see how to convert the account into a Business one.
Creating a Business account (optional)
After creating a Pinterest account, you can convert it into a Business one mainly because Business accounts provide you with extended stats for views and clicks. You can skip this part, however.
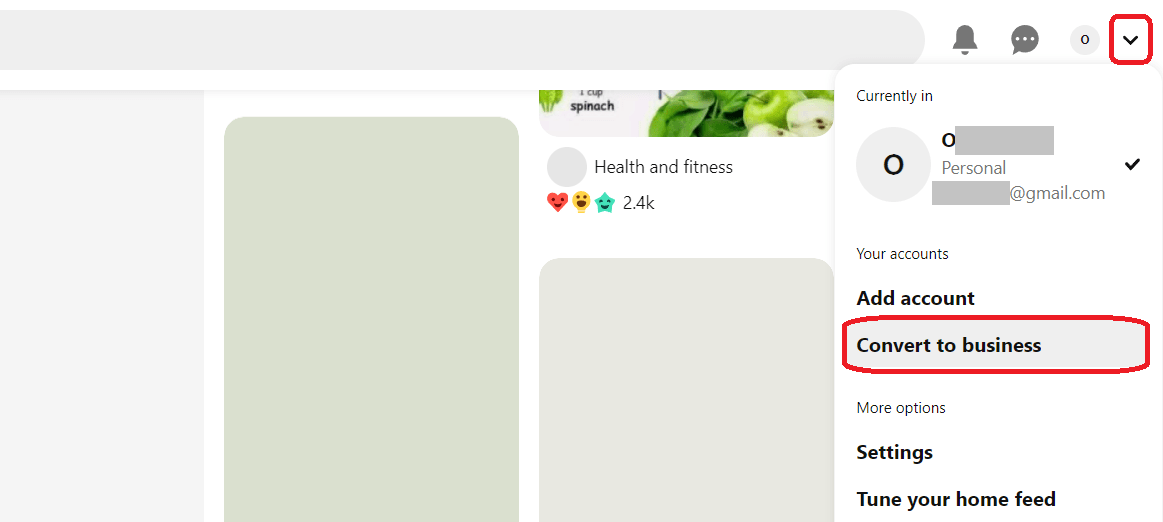
1. Click on the down arrow from the upper menu bar (near your profile) and choose Convert to Business. You’ll be offered to upgrade to a free Business account. Click Upgrade.
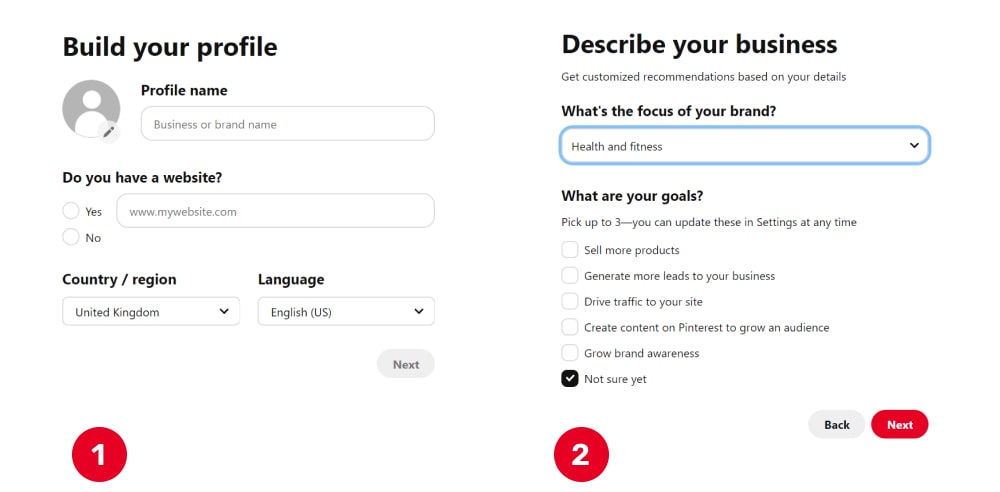
2. Pinterest asks you to enter your Profile name, which will be the name of your business, blog, or brand. We’ve chosen BigCityLife to have lots of options for content creation. Pick the name you find most suitable for your business and niche.
3. Next, Pinterest offers you to describe your business. We recommend answering only the obligatory questions:
- Your website URL
- Country/Region
- Language
- What’s the focus of your brand (pick one of the categories that match your niche or select Other)
- Your business goals (pick Not sure yet if you can’t choose)
- Describe your business (Pick Blogger, Publisher, or Other)
- Will you ever be interested in running ads? (pick Not sure yet if you don’t know)
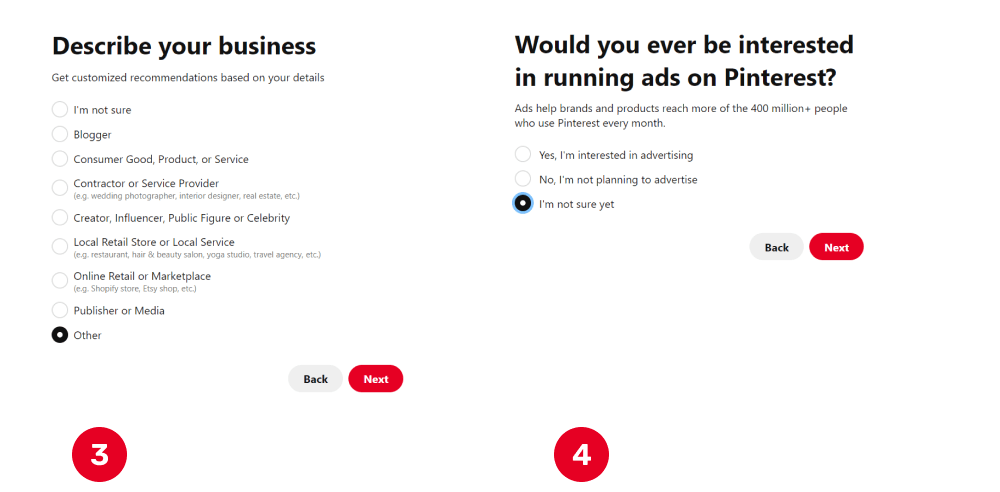
Having finished with all questions, click Next to see your Pinterest account upgraded to Business. Let’s go now and create your first board and Pin! This way, you will be able to use Pinterest to drive traffic to your website and get more ad views and payouts.
Create your first Pinterest Board to place Pins
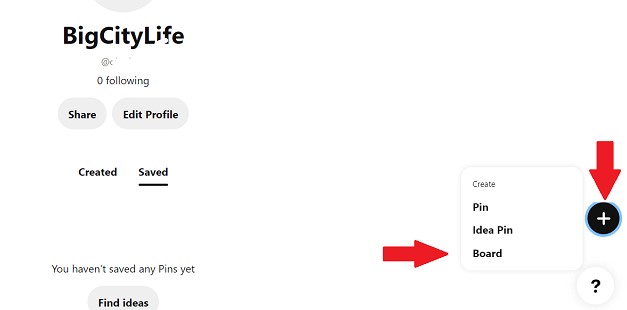
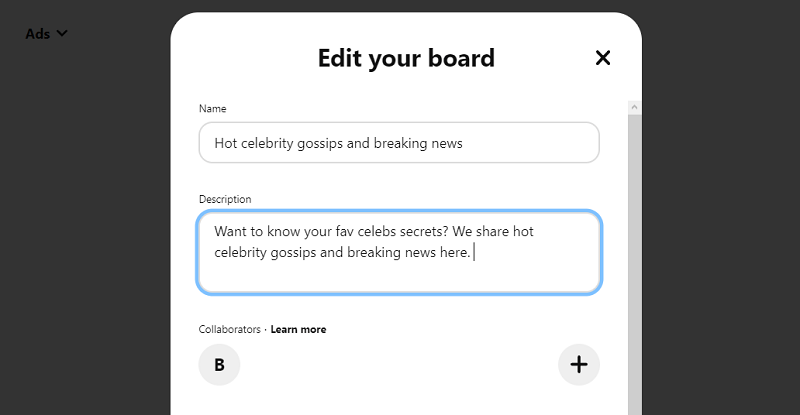
Now comes the most creative and exciting part! We’re going to create your first board and Pin, which you will use as a traffic source. Look at the lower part of your account and choose the PLUS icon. Select Create Board. You can now come up with the name of a Pinterest board and its description.
Pinterest SEO note
Make sure to include keywords and key phrases in titles, headings, and descriptions. Pinterest algorithms are pretty smart in finding relevant information, and you may get a massive burst in organic traffic one day.
A couple of relevant hashtags will improve your pin discovery as users enter hashtags to find hot topics and content.
One more thing: there should be a match between your website content and your pins’ message. Though some publishers successfully ignore this rule, we must mention this 😉
Search phrases will change, and you will have to update your board’s descriptions regularly.
Boards and Pins topics that grab attention
Remember why we need all that Pinterest traffic? Right, to send it to your website where you place advertising codes. Hence, there should be three vital points you never miss:
- a popular topic with engaging content;
- a teaser that will make users leave Pinterest and go to your website;
- content matching between Pins and your website content – otherwise, users will leave before watching ads.
Which Pins drag maximum traffic?
If you’re in search of new blog articles topics, or have no idea how to make up catchy content, these ideas may give you some clues. Try creating posts and Pins for the most discussable and provocative topics, or try those that are related to self-care and health. Here are possible topics you can start with.
- Workouts, Fitness, Body Positive
- Entrepreneurship and Money-Making
- Cryptocurrency and NFT
- Funny Memes, Jokes, Office Humor
- Remote Work and Education
- Celebrities
- Gossips, Scandals
- Unusual Sensational Facts
- Social Media Marketing Hacks
Make sure you can produce a lot of content for one or several topics. By the way, AI tools can help you generate content much faster.
Let’s get right into practice now and create some Pin designs!
Tips for designing Pins
The best advice you can ever have is to do some research and pick the best ideas from your nearest competition. Just enter some key phrases in the search field and look through the offered results – нou will get plenty of insights! And here will list some essential tips.
- Use faces and emotions.
- Prefer pictures with zoomed objects with fewer details.
- A heading and an image you choose must match.
- Take contrast colors for writing headlines.
- Avoid using blurred or low-quality pics.
Practice | How to design catchy Pins from scratch
When you need to create a Pin, Canva can be very helpful. It offers a free account and allows for almost unlimited designs with free templates or from scratch. Canva is also available on mobiles. Navigate to Canva.com and sign up using the SIGN UP button in the upper menu.

You can search for ‘Pinterest Pin’ templates or create a blank canvas on your dashboard. We’ll go with a blank canvas of a 1080×1920 Pin. Yep, the size also fits Instagram Stories 😉

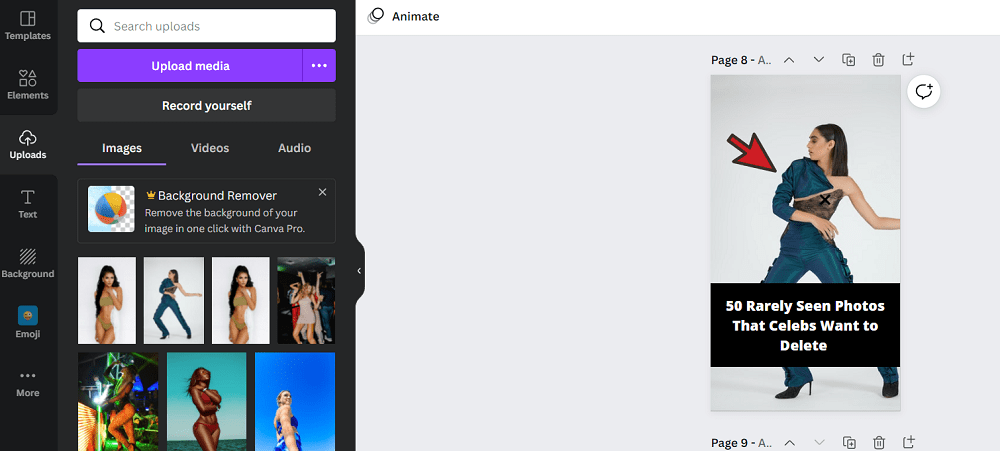
Suppose you want to create a Pin for some blog article with hot celebrity gossip or scandals. You will need a photo and a super-triggering headline here. Though you can search for photos within Canva resources, we recommend using free platforms like Unsplash and Pexels. They store many real-life portraits and shots, not as polished and glossy as on photo stock storages. Once you’ve found enough images, upload them to Canva. You can simply drag and drop the shots.
We’ve picked a photo of a girl who reminds one of the celebs and added a magnetic caption. The caption’s position is doubtful, but we used a pointer to additionally draw users’ attention.
Another try is with a Crypto topic. Again, we took a familiar pattern with a zoomed Bitcoin followed by caption to hook curious readers. Not the best example of a Pin, but it’s enough to outline the idea.
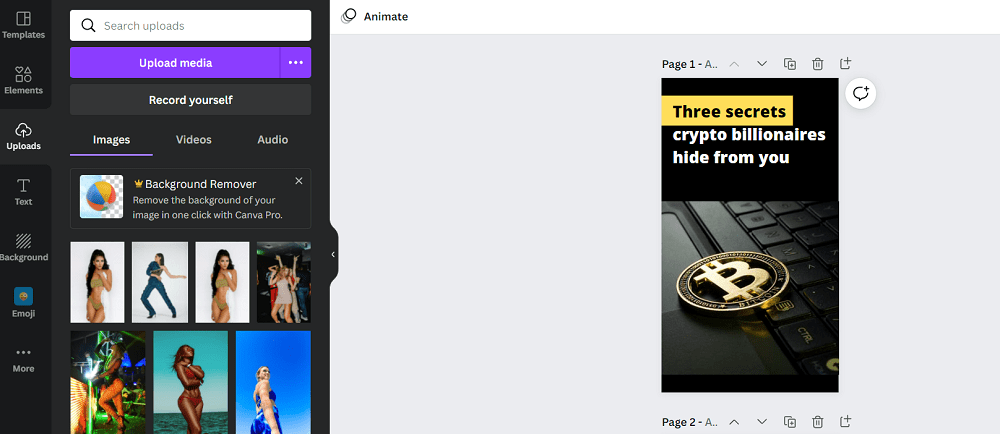
Done! That’s how easily you can make any Pin! Practice a little, and your visuals will be much more captivating. Let’s now jump into the next section, where we will upload our visuals and make up a genuine Pin. This will be your unique way to use Pinterest to get free traffic.
Practice | How to create Pins with SEO descriptions
Now, it’s time to create a Pinterest Pin, name, and describe it using the keywords.
Pins are catchy and informative pictures with short descriptions that capture attention and lead users to your website. Pins can be used as is, if you don’t want to use Pinterest to drive traffic to your website, but today’s topic is about growing traffic.
From your account, hit the PLUS icon on the lower part of the screen. Then choose Pin. In the same way, you can click on the Create button in the upper menu. You now have a layout of your future Pin in front of you.
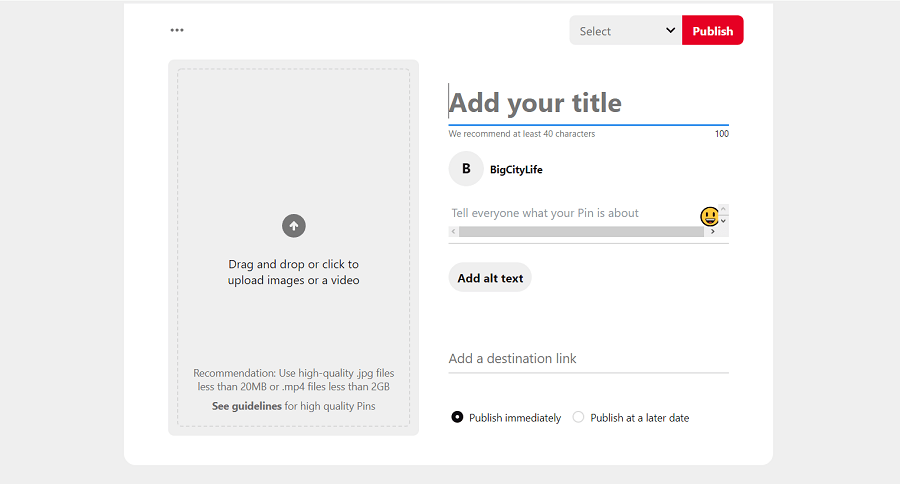
Drag and drop the picture you designed earlier. Add a title that will match but not repeat the phrase used on the image. Remember to use keywords, which are possible search phrases readers use to find your content. Make sure you have put a few hashtags, too. Paste your website page URL in the Add a destination link.
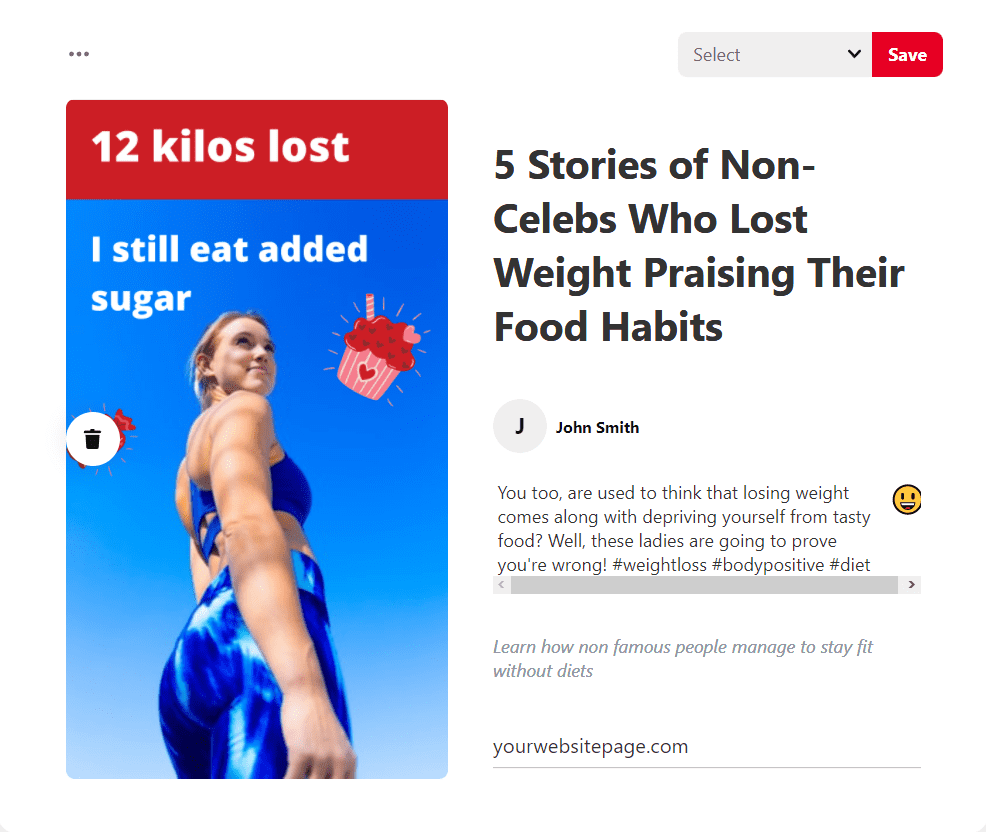
Done! You can publish the Pin. When you use Pinterest to drive traffic to your website, you can’t expect instant results. Sometimes, it takes weeks to make Pinner discover the Pin and then visit your website. Once you jazz up your Pinterest account and start getting views and clicks, your organic website traffic starts growing, too. Users will consume more ads, and you will enjoy increased ad earnings. So what are the most trending ads that can bump up your revenues? Let’s find out!
That’s how to use Pinterest to drive traffic to your website and get paid
Well, Pins are all set up. Your website is ready to welcome new quality traffic. Which ads can you place to get as many ad views as possible? Don’t underestimate the rest of the high-paying ad formats, which we outlined in this short guide.
Popunder + Social Bar combo
Adsterra always recommends mixing ad formats to monetize as much traffic as possible. Diverse techniques help generate more ad views. One of the hit combos is Popunder paired with Social Bar. While the first one appears outside your website, the latter will be visible on the web page.
Here you can read our comprehensive guides with actionable tips for making money with Popunders and monetizing with Social Bar.
Use this short tutorial to place these ads on any website.
- To begin with, you need to sign up or log in as a Publisher.
- From the vertical panel, hit Websites.
- Click the ADD NEW WEBSITE button.
- On the pop-up window, fill all the fields required and pick Popunder. Click the ADD button,
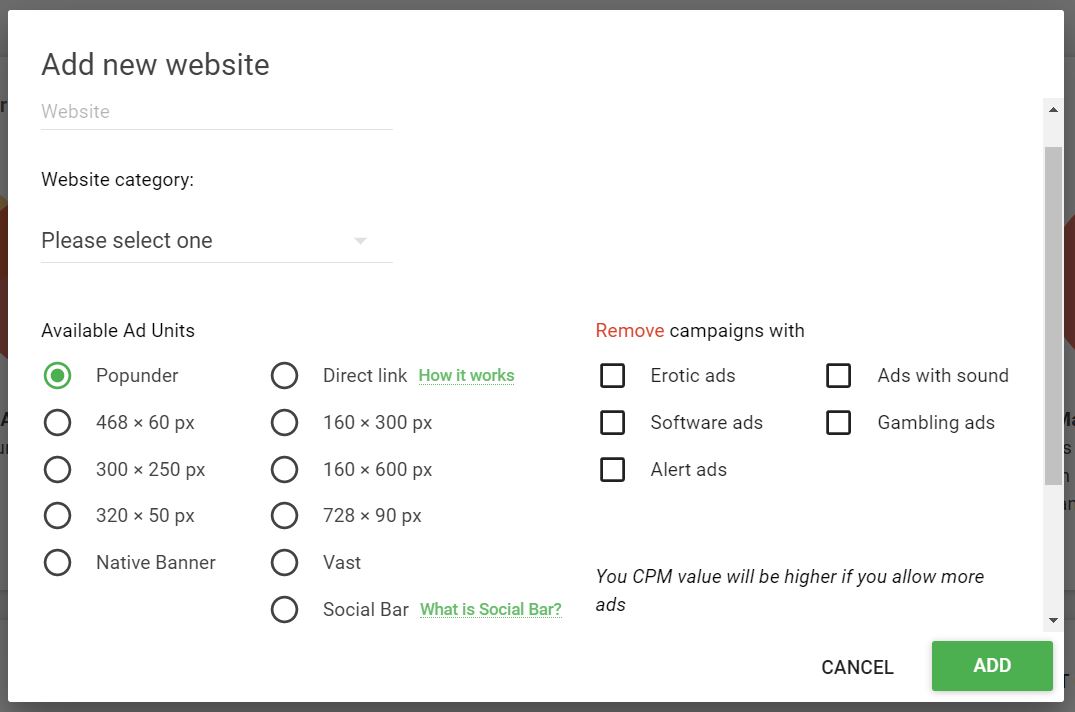
Now please wait a couple of minutes till we verify your website. When you see your website status changed from Pending to Active, click ALL CODES → GET CODE.

Done! Copy the code and place it above the closing “<head>” tag inside the source code of your page. Ads run smoothly on all HTML, Blogger, WordPress websites 😉
To get the Social Bar code, please open the Websites page and repeat previous steps. Make sure to follow the instructions and put the ad code strictly above the closing “</body>” tag.
Here you are, ready to get increased ad earnings!
Bonus part 1 | Building a website from scratch: a minimum package you will need
As we have just outlined, to use Pinterest as a free traffic source for boosting ad views on a website, you will need…exactly, a website 😉
Now an important note: if you already run a website or blog or have a clear idea of what’s required to do, then skip this part and jump into the next section — how to create highly effective content.
So what’s the minimum package of tools, services, and content pieces you need to build a website from scratch?
- hosting;
- domain name;
- CMS or website builder;
- posts, articles, or content pages.
A platform for building websites
The only no-code way to create a powerful website from scratch is a website builder or CMS (content management system.) What should it be like?
At first, the websitr builder must provide you with lots of themes and web pages templates. Mobile-friendliness and loading optimization come second.
Then comes the possibility to place advertising codes with ease. If your website builder does not allow for placing ads, you won’t be able to monetize traffic. For instance, Wix is a great site builder, but it only enables ad codes to paid plans’ users.
WordPress is one of the most obvious solutions for a beginner publisher and moneymaker. It’s irreplaceable when you need to start faster. WP makes it very simple to set up one of the free blog themes to get hosting and a unique domain name. Make sure you saved this guide on how to install WordPress.
You can go for a Blogger (earlier, Blogspot) platform. It is also easy in use, although not that feature-rich. Thousands of bloggers run their websites here. And you can also use the guide on how to make use of the Blogger platform.
Google Sites serve a set of tools to build a simple landing page or a website. And it’s absolutely free service.
As there are plenty of CMS and tools on the market, we compilated a handy guide to the most suitable website builders.
Domain name
Both WordPress and Blogger allow you to use free domain names ending with .wordpress.com and .blogspot.com. However, publishers usually prefer unique website names, and that’s reasonable. A unique name makes your brand different and easy to remember, while your site will seem more credible to users.
With WordPress, you get a free domain name when buying a hosting service. You can also go for GoDaddy or Namecheap; they’re known as the most cost-effective providers. Namecheap is particularly great as a hosting, too, but its servers are remote from Australia and Asia, so make sure it suits you.
Hosting
Hosting is a place that holds all of your website’s files. It affects how fast your site can load, which types of files you can upload, and how many of those files you can store. Many hosting platforms also limit you to the number of monthly users.
Among the most usable and loyal hosting platforms for WordPress publishers are Bluehost, Namecheap, HostGator, and others. Get to know the most-usable ones in this guide.
Even though all of us are willing to save money, we don’t recommend using free hosting platforms. Some of them are pretty powerful, though. If you by any reason can’t purchase hosting plans, look at these free hostings (but read their limitation carefully):
Make sure your hosting provides you with SSL.
Blog theme or website layout
It is vital to manage a flexible and lightweight website layout. It will remove headaches when you are pasting both content pieces and ad codes. If you spend a couple of hours on choosing your website layout, it will save you nerves in the future.
Adsterra writers have made your work less time-consuming! Read our guides to free Blogger templates and WordPress themes:
What to look at when choosing a theme?
- Responsive design
- Download speed
- SEO optimization and compatibility with Core Web Vitals
- The latest update’s date
- HTML5 and CSS3 development
- Google font library integration
- Social sharing buttons and other social media integrations
- Usability and customization
- Layouts with ad spaces
- Ad codes’ support
- Subscription forms and other widgets for bloggers
Bonus part 2 | Making up triggering and valuable content
Having done with the minimum necessary tools to launch a website, we now move to the second must-have component — the content. Here is the minimum viable set of actions for creating content. Speed and quality don’t walk along in general, but we can help you out with some effortless and clean tricks.
To begin with, a couple of some very helpful guides:
How to create articles that will hook readers
Let’s be honest: no one can learn to create content from scratch overnight. On the other hand, you can get actionable formulas to enhance your existing articles, rewrite them and saturate with valuable information.
You’re going to create click-boosting pins and use Pinterest to drive traffic to your website. To this end, your articles and website pages must match pins’ subjects and vice versa. You need to make users at least until they see some ads and be counted as ad impressions.
To end up, a dash or actionable tips:
- Use high-resolution images that you designed for Pins earlier.
- Link between articles to make users stroll across your pages.
- Match headings between pins and your blog posts.
- Cross-link your posts to make users stay on your website.
- Apply powerful heading formulas:
- X Ways To…
- X Reasons Why…
- Who Else Wants…
- All That You Need For…
- Last Chance To…
- Grab Your Free [Ebook, Tips, White Paper, Course], etc.
Summing up
If you’re persistent enough, you can use Pinterest to drive traffic to your website boosting ad views and getting larger payouts. It’s a legitimate solution for those who need to grow organic traffic and earn more from ad codes.
Where do you get ad codes that will be highly paid? Adsterra delivers you a whole bunch of them. Along with Popunders and Social Bar we mentioned, you can grow income with Native Banners, Display Banners, Direct Link, or VAST videos. But huge profits never come from the air. Register and make your first ad code bring you money!
